
The Art of the Dragon - A Beginner's Guide to Pyrography (Wood Burning) Art
So you want to learn pyrography? Well, you’ve come to the right place! Pyrography is a fancy word for the art of burning wood. It’s a bit hard to pronounce, but does have the added effect of making you feel like a wizard. I’ve been burning since late 2021, and instantly fell in love with the art form. I discovered wood burning at a critical time in my life. I’d been an artist for many years at that point, even going to college for it and eventually finding a job in graphic design. But none of that felt fulfilling. I still don’t really know what I want to be when I grow up, but I know I want to be happy, and this has been helping me do just that!
Wood burning brought some of that happiness that I desire into my life, and I’ve been chasing it ever since. I can’t quite explain how or why this art form clicked with me, but it did, and now I want to help it click for you dear reader! Anyone can learn wood burning if they really want to, yes even you! And I’m here to help you get started.
Tip #1 - What Pen Should I Use?
Over the years, one of the most common questions I receive is “what pen do you use?” I’ve had three pens so far throughout my art journey, and I currently use this TRUArt pen, but I wouldn’t consider this pen “beginner-friendly.” It’s a big unit with lots of accessories and quirks; great for someone with wood burning experience, but not necessarily for someone who’s looking to learn wood burning from scratch. So, that’s why I’m making this blog post; to give curious beginners a good place to start learning!
Choosing your first wood burning pen can seem overwhelming. There are lots of different companies who sell different styles of pen, and they all look different but also kinda the same? It can be confusing if you’re not sure what you’re looking for. So first, we’re going to look at some pens and what to look for when shopping for your first one.
Pens can range from $10 all the way to $200, so before you start shopping, mentally set aside how much money you want to spend. In my opinion, if this is your first time wood burning, I would not spend more than $50 on your first pen. Expensive tools are a great investment, but you need to be sure this is a hobby you enjoy first! I’m speaking from experience; don’t blow $200 on a tool just for it to collect dust when you lose interest. A “cheap” pen isn’t a bad pen.


All of these pens have solid tips. Pens with this style of tip are usually more affordable than wire-tipped pens (which we’ll talk about in a second). In addition to being more affordable, they’re also way more beginner-friendly. Oftentimes they come as “starter kits” that include the basics of what you need to get started, like an instruction manual and a handful of interchangeable tips. That’s really all you need as a beginner. My first pen didn’t even have a temperature control dial – just an on and off switch – And it got me started on my art journey just fine! Your tools should grow alongside your art, so don’t feel like you need to blow your whole budget on a fancy pen.
Now, if you do want to go a bit more expensive and experiment with some wire-tip pens, here are some great beginner ones I recommend.

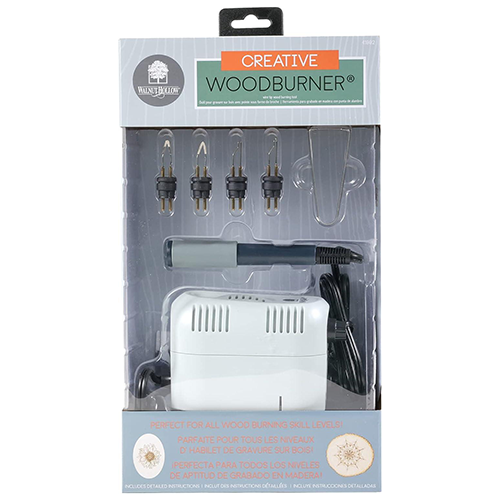

That Walnut Hollow Creative Woodburner tool is actually the exact pen I had before upgrading to my current one! It offers the experience of a wire-tip pen, but the tips are much easier to change. In a typical wire-tipped pen, the wires are individually unscrewed and exchanged, a process that can be difficult for beginners to get the hang of. With this tool though, you just pop off the old tip, and put the new one right in. It’s an absolutely wonderful tool, and is great if you’re transitioning from a solid-tip pen into a wire-tip pen.
Wire-tip pens are a lot more versatile in my experience, and I would recommend upgrading to one in the future as your art journey continues. You can definitely start with a wire-tip pen, but don’t feel like you need to break the bank to afford one. Solid-tipped pens are wonderful, and I know a lot of amazing artists who use them regularly as professionals! It’s all up to personal preference. Like I said earlier, your tools should grow alongside your art. If you start at an affordable price, you’ll start learning what you do and don’t like; what works for you and what doesn’t.
As a general blanket statement, I would avoid any off-brand, suspiciously cheap pens you might find on Amazon. Oftentimes they don’t work right, and can even be dangerous if you’re not careful. Buying from Amazon is fine if you know what you’re doing, but if they’re advertising something like the kits listed above for only $10, I’d advise you to avoid that.
Tip #2 - “How to Choose and Prepare Your Wood”
Wood burning requires two things by design: wood and burning. We’ve already touched on the burning part, so let's move onto the wood.
Most wood can be divided into two categories: softwood and hardwood. The names “softwood” and “hardwood” don't actually come from the hardness of the wood itself, rather what type of tree it comes from. Generally, softwood is sourced from coniferous trees, while hardwood is sourced from deciduous trees.
You can use both types of wood for wood burning, but they differ from each other in small ways. Softwood is typically less dense and more moist, while hardwood can be rough and difficult to burn at first. If this is the case, do not increase your pressure on the pen; pushing hard into the wood will only damage your pen. Rather, turn up the temperature if that’s an option on your pen, or move your pen more slowly across the wood. Patience is key when trying to get a nice, deep burn. Conversely, you may find yourself needing to turn down the temperature, or burn a bit faster when using softwood.
Some woods like basswood and maple are smooth-grained. A smooth wood grain makes it easier to make smooth lines when burning, so you may find those easier to practice on as a beginner.
Regardless of what you’re burning on, just be sure to practice in a well-ventilated space with a good, sturdy mask. The smoke that your wood produces when burning can be toxic. Also, as a general rule of thumb, you should avoid burning wood from poisonous plants, or from wet and rotting wood. It may seem obvious, but it’s important to know!
When you go to a craft store to find wood, you may find yourself overwhelmed with all the different products they have! Generally, the most common woods you’ll find at craft stores are pine, basswood and birchwood. As mentioned earlier, basswood is a smooth-grained wood. This makes it a really good beginner canvas, and I highly recommend it if you’re just starting your wood burning journey.


You don’t have to choose just one type of wood to use either. I use all kinds of different wood species in my projects, and I encourage you to try out a bunch of different wood as well! You may prefer one species over another. The great thing about wood burning is that there’s not just one way to do things. Experiment and discover what works best for you!
Now, there’s really only one thing you need to do to your wood before you start the art process. That thing is sanding! You can use a sheet of sandpaper, a sandpaper block, or even a power sander. I prefer to use sandpaper blocks, as I find them easy to hold in my hand. Sanding the surface of your canvas is incredibly important, as a rough surface can affect the smoothness of your burn. You’ll be able to tell if a piece of wood is sanded or not by lightly running your hand across the surface. If it’s unsanded, it will feel rough and grainy. If it’s sanded, your hand should glide across it easily. Smooth wood makes for a smooth burn, so before you do anything, make sure you sand!
Tip #3 - How to Sketch (or Transfer) Your Design
There are a few different ways to get your design onto your wooden canvas. The two most common ways are either freehanding your sketch or using carbon transfer paper. If you’re not interested in laying groundwork for your piece and would rather freeball it by burning without a guideline, you are absolutely welcome to skip to the next section!
I stand by the sentiment that you don’t need to be good at drawing in order to be good at wood burning. Being a practicing artist helps for sure, but there’s no reason you can’t learn to draw while also learning wood burning. So if you’re not confident in your art skills, don’t go anywhere! Keep reading, you can learn just as well as anyone.
If you’re choosing to freehand your sketch, it might be intimidating at first, especially if you’re not a practicing artist, but there are some tricks to making it easier.
Pick up your pencil and hold it loosely. Don’t use too much pressure when sketching because chances are, you’ll have to erase a lot. Be loose and fast, but deliberate. Use shapes like circles to block out where you want things to be, and fine-tune the details after you’ve spaced everything out. This is a great method for people who have experience drawing, but if you aren’t as experienced, this can still be a good method for you with some practice!
Also, don’t be afraid to use stencils when freehanding! I have a truckload of stencils of various shapes and sizes. I use circular stencils all the time. Use stencils to space out where you’d like things to do. You can even use more specialized stencils to add things like flowers, animals, stars, and all kinds of things. I’ve added a link to my favorite circular stencils just below this section.
If you prefer a different method, transfer paper is a common and reliable method of transferring your designs onto your wooden canvas. If you have no prior art experience, you may prefer this method! It allows you to fine-tune your design before drawing it onto the wood.


First, sketch something out on a piece of regular notebook paper. Or, print out a design if you’re making something like a logo or an exact copy of an established character (like a render of Mario or something – side note: I won’t preach to you too much, but as a general rule, you should never trace over another artist’s art and claim it as your own. Someone else’s art can inspire you to make your own art, and it’s good to be inspired! But you should never blatantly trace or copy someone else’s art stroke-for-stroke and claim you made it. Doing that is just poor etiquette. I’m sure most artists out there are happy to inspire an idea or art style. Just, don’t steal or act in bad faith, it’s not very nice and you won’t make too many friends in the community that way).
Anyway, now that you have your design, it’s time to start transferring! Carbon transfer paper is this thin, black paper. One side is a bit silkier than the other because it is covered with graphite. If you run your finger against it too hard, you’ll get covered in black marks. This is what you’ll be applying to your wooden canvas!
Take your design, and tape it onto the wood. Slide the carbon paper graphite-side down between your design and the wood. Then, just trace back over your design with medium pressure (if you press too hard, it could be difficult to erase, and if you don’t press hard enough, the carbon won’t transfer. It’s a lot of trial and error). Flip the paper up using the tape as an anchor point to make sure you’re pressing hard enough. I like to use sharp lead pencils like the ones listed above.
Transfer paper is a wonderful tool if you have an established design you want to apply to the wood, or if you’d prefer not drawing directly onto the wood. I use it most often when I’m making something big and intricate. I’ll draw the piece digitally, then print it out and transfer it with graphite paper. I use both methods pretty frequently; it’s all up to your personal preference!
Tip #4 - How to Burn!
The first thing you need to do is turn on your pen. If you have a temperature control dial on your machine, start at a lower temperature and slowly turn it higher until you find a temperature that works for your machine. It’s better to start at a lower temperature and gradually turn up the heat rather than start too high and risk burning the wood too much. I usually keep mine at about 50%, and will adjust it up and down as necessary.
I like to have a scrap piece of wood off to the side so I can test my temperature before burning on my art piece. I’ll also use it to test out different textures and burning methods. I definitely recommend having an extra piece of wood close by just to test your pen. I love testing out different textures and pen tips in my free time. It’s fun, and it also helps me learn what pen tips and methods are best for the effect I’m trying to achieve.
Some artists like to make these things called texture boards. If you’d like to make a texture board, take a scrap piece of wood and divide it into a grid. Each square will contain a different texture or shading style, created either by a different pen tip or a different method of using your pen (like dotting or crosshatching). You can label these squares, and now you’ll have a cheat sheet for different textures and shading styles!
You can choose any mix of burning techniques you like! I like doing line art with a mixture of hatching and dotwork. Some people don’t use line art at all, and other people like to use their pen tips to shade with a nice gradient.
If you’re overwhelmed with so many different options in front of you, I recommend finding some artists online that really click with you. Find something that makes you say, “I wanna do that.” Study their art styles and learn from their methods. Combine different styles from different artists, and get inspired! By doing this, you’ll develop your own unique style in no time. Plus, your starting point will feel less overwhelming if you have some inspiration on hand. (And again, when I say study, I don’t mean copy. I mean, really truly study them. Experiment with different pen tips and drawing styles, try to dissect how each artist forms their shapes, how and why they draw each line. Break down what makes their art so appealing to you, and work on replicating that in your own unique way).
Once you’re finished burning, take your eraser and go to town on your canvas. Erase any pencil marks or charcoal marks that might be left over from your initial sketch. Polymer erasers are great for this. If any parts of your sketch are proving difficult to erase, take some sandpaper and gently rub that area. It should get rid of those lines easily, just be careful not to sand down your burning too much.
Once you’ve cleaned up your piece, you’re essentially finished! Of course, you can go back and add more details or color, but at this point, you’ve learned all the basics!
Really, the most important things to keep in mind when wood burning is your pen’s temperature and the amount of pressure you put on the wood. As long as your pen is a good temperature and you aren’t pressing too hard against the wood, you’ll be burning like a pro in no time. It takes practice! And I can’t teach you exactly how to burn. I can teach you the basics, which is hopefully what I’ve done over the course of this blog post. But as for your own techniques and styles? That’s something you have to discover for yourself, and I think that’s really exciting!
BONUS Tip #5 - How to Seal your Wood
Wait, what are you still doing here? We finished burning our designs so we’re all done, right? Well, we’re almost done. If we want to make sure our designs are protected and long-lasting, we need to seal up our wood (and no, that’s not what I mean).
Think about the wood products you see every day. Things like hardwood floors and tables are sealed up with various different types of varnish. If they were left unsealed, they’d get scratched and stained way too easily. The varnish also gives the wood a nice, professional look. Well, we seal our wooden artwork for the same reasons!
(As a quick aside, if you want to add any color to your piece, be sure to do it before sealing it)!
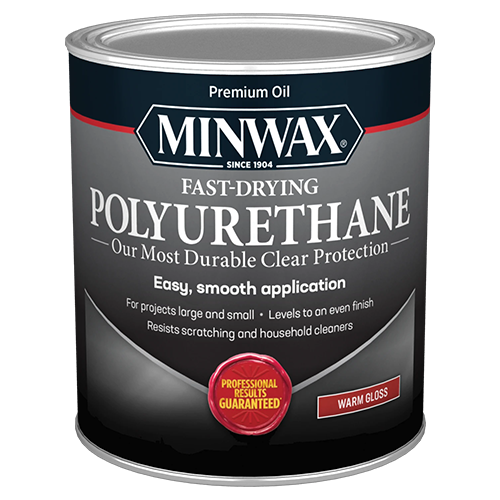
There are a lot of different ways you can seal your work. There are different varnishes, polyurethanes, and wood oils, all of which can give a unique finish and shine to your artwork. Some people like to use resin to seal their pieces. I’m not qualified to teach you about resin, as I don’t use it, but know that it is an option! My two favorite things to use are polyurethane and wood oil.
Polyurethane (and Polycrylic) is great because it can be applied with a paint brush, or an aerosol can. Some color methods like colored pencils or water-based paints can smear if reactivated by a topcoat. That’s why having an aerosol form is so handy! Coating your piece in a few layers of aerosol polyurethane will give it that protection and smooth finish just as well as any other brushed-on sealant.
For pieces that I don’t need to worry about smearing, wood oils are by far my favorite way to seal wood. It darkens the wood ever so slightly, and adds just the right amount of shine to the piece. Wood oil is applied by using a clean, dry cloth. Wet the cloth with some oil and gently work it into the wood using small circular motions. Let it rest for a bit once you have the entire piece covered, and then wipe off any excess oil.


Regardless of how you seal your artwork, you should always let it rest overnight. Giving the topcoat a long time to settle will ensure that your artwork stays protected and looking good. If you need to apply more than one layer, just read the instructions. Most sealers have instructions printed on the container, so as long as you follow those, you’ll be fine!
Sealing your artwork isn’t really that complex, all things considered. It’s really a process of trial and error; finding out what works for you and what you enjoy working with. It can definitely seem scary to seal a piece. The fear of ruining something you spent a lot of time on is real. I know when I first started out I ruined a few pieces by smearing colors around or incorrectly applying my aerosol topcoat. But that ruination is an important step in learning something new. If you do something right the first time every time, you’re never going to learn anything. So don’t be afraid to do something wrong. Everything you do has value; if not to the world then to yourself.
This blog post wasn’t meant to be an instruction manual, more, a guidebook to help you along on your own artistic journey. And I really hope I was able to do that – to help introduce you to a new skill or hobby. And I hope, if it’s something you enjoy, you share your work with me and with the world. I don’t care how “good” it is. I want to see it. I want to see what you create with your own two hands. So, come on and show me!